
 By DQCS
You can get a more modern layout without a full remodel by targeting small demolition wins that cost less and finish fast. If you remove a non-load-bearing wall, half-wall, or soffit, you’ll improve light and sightlines with minimal framing. If you tear out a bulky closet or chimney bump-out, you reclaim usable square footage. But before you swing a hammer, you’ll need to confirm structure, permits, and haul-away costs—because one hidden issue can change the budget fast.
Plan Small-Scale Demolition Without Surprises

Before you swing a sledgehammer or book a crew, map the job from permits to disposal so the budget doesn’t blow up mid-project. Walk the space and list exactly what’s coming out: cabinets, tile, drywall, fixtures, or flooring. Confirm what utilities run nearby, and schedule shutoffs if needed.
Build project budgeting around line items: tool rental, dumpster size, dump fees, protective gear, and patch materials for temporary weatherproofing. Add a 10–15% contingency for hidden fasteners, extra trips, or heavier debris.
Set Safety precautions upfront: isolate the work zone with plastic, cover HVAC returns, wear eye/ear/respiratory protection, and stage debris to keep exits clear.
Photograph before-and-after conditions, and track receipts daily to stay on target.
Remove a Non-Load-Bearing Wall to Open Rooms
Before you start knocking out a wall to open up two rooms, you’ve got to confirm it’s non-load-bearing by checking joist direction, looking for a beam or posts above, and verifying framing in the attic or basement.
Next, map any electrical, plumbing, or HVAC runs inside the wall and price out shutoffs, reroutes, inspections, and permits so you don’t get hit with surprise change orders.
Finally, plan the opening details—temporary bracing if needed, clean cut lines, and matching flooring, drywall, trim, and paint—so the new space looks seamless without ballooning your finish costs.
Identify Non-Load-Bearing Walls
If you want to open two rooms without triggering pricey structural work, start by confirming the wall you plan to remove isn’t load-bearing. Check the basement or crawlspace: if joists run parallel to the wall, it’s often non-structural; perpendicular joists raise red flags.
In the attic, look for rafters or ceiling joists landing on the wall. Trace the wall on each floor; if it stacks with walls above, assume it supports weight.
Lightly tap: hollow sounds and thin studs can indicate a partition, but don’t rely on sound alone. When in doubt, pay for a brief structural consult—protecting Structural integrity costs less than fixing mistakes.
If it’s borderline, plan Wall reinforcement before you demo.
Plan Utilities And Permits
Where do the wires, pipes, and ducts actually run once that wall comes down? You can’t guess—confirm. Start utility planning by shutting off power, pulling outlet/switch covers, and using a stud finder with live-wire detection.
Cut small inspection holes to trace electrical runs, plumbing vents, and any HVAC chases, then budget for reroutes, junction boxes, and patching. If you find supply lines or a stack, price a plumber before you demo.
Next, handle permit acquisition early: call your building department, ask whether electrical/plumbing/HVAC changes trigger separate permits, and schedule rough-in and final inspections.
Keep drawings, photos, and product specs; it cuts rework and failed inspections that cost time and money.
Create Seamless Openings
Once you’ve mapped utilities and lined up permits, you can open up the space by removing a non-load-bearing wall and leaving a clean, finished-looking opening—not a hacked-out gap. Verify it’s truly non-structural by checking joist direction, attic framing, and any doubled studs; when in doubt, pay for a quick engineer consult to protect Structural integrity.
Shut off power, cap any abandoned wiring in accessible boxes, and plastic off returns to control dust. Cut drywall in clean rectangles, pull fasteners, and remove studs without prying against floors or ceilings.
Plan Material selection early: match casing profiles, pick a properly sized header (even if not required), and budget for corner bead, shims, and paint to blend the passage.
Demolish Half-Walls and Soffits for Sightlines
You can gain a big visual upgrade by removing kitchen half-walls and opening up the line of sight between cooking, dining, and living areas without touching major structure.
When you eliminate bulky soffits, you’ll often reveal cleaner ceiling planes and simpler cabinet lines. However, you should budget for patching drywall, rerouting lights or ducts, and repainting.
Start by confirming what’s inside the half-wall or soffit, then plan a clean demo and finish sequence so you don’t pay twice for repairs.
Remove Kitchen Half-Walls
Although half-walls and kitchen soffits can hide plumbing runs or ductwork, they often kill sightlines and make the space feel chopped up, so removing them is one of the highest-impact small demolition upgrades for the least material cost.
Start by confirming it’s non-load-bearing: check the crawlspace/basement for beam breaks, review framing direction, and, if unsure, pay for a quick structural consult.
Shut off nearby circuits, cap any low-voltage lines, then demo with a recip saw and pry bar, cutting drywall first to control dust.
Budget for patching: floor infill, baseboard, and drywall returns.
Plan Decorative accents afterward—like a wider cased opening or new trim—to hide seams.
If you discover support posts or doubled studs, add Structural reinforcement instead of forcing removal.
Eliminate Bulky Soffits
Half-walls open up the room at eye level, but bulky soffits can still box in the ceiling line and make the whole kitchen feel lower and darker. Before you demo anything, confirm what’s inside: some soffits hide ductwork, wiring junctions, or plumbing vents.
Cut a small inspection opening, then shut off power and protect cabinets with plywood and drop cloths. If it’s hollow, you can remove drywall and framing with minimal structural risk, then patch the ceiling, extend crown, and repaint for cleaner ceiling aesthetics.
If utilities run through it, price rerouting versus building a slimmer soffit design.
Plan for disposal fees, joint compound, and texture matching—those often drive the true cost.
Improve Open Sightlines
Where does the room feel pinched—at the counter line, the ceiling edge, or both? If a half-wall blocks your kitchen-to-living view, you can demo it to knee height or remove it fully, then replace the structure with a properly sized beam if it’s load-bearing. You’ll spend less when you keep electrical runs and HVAC in place, so open the wall only where sightlines matter.
For soffits, cut back to the cabinet face or eliminate the dropped section that hides nothing; that boosts natural lighting and makes ceilings read taller.
Plan privacy preservation with a pony wall, reoriented island seating, or a slim slatted screen. Patch drywall, match texture, repaint, and you’re done.
Tear Out Bulky Closets to Build Better Storage
One targeted closet tear-out can free up surprising square footage and lower your remodeling costs at the same time. Start by removing shallow reach-ins that steal wall length and block furniture placement. Cap plumbing or wiring, then patch drywall and flooring only where the footprint changes, not the whole room.
Replace the bulky box with a leaner system: a 24-inch-deep built-in on one wall, or double-hang rods with a top shelf and drawers below. Plan closet organization around what you own—measure longest garments, shoe heights, and hamper volume—so you don’t overbuild.
For wardrobe redesign, use adjustable standards and melamine shelves; they’re cheaper than custom millwork and easy to reconfigure. Add LED strip lighting and a full-height door to hide visual clutter.
Remove Chimney Bump-Outs to Reclaim Space
Although a chimney looks permanent, you can often remove or slim a non-structural bump-out to gain back several inches of floor width and straighten a wall for cabinets, shelving, or furniture.
Start by confirming it’s not load-bearing and that no active flue serves a furnace or fireplace. Hire a pro to cap the flue at the roofline, patch flashing, and verify code requirements for chimney removal.
Inside, demo brick or framed chases carefully, bagging soot and using negative air if needed. Budget for disposal, roofing patchwork, drywall, and baseboard returns.
If you can’t remove it fully, consider a shallow framed chase with new studs and insulation, reducing depth without compromising venting—your “Bump out expansion” can become a flat wall that layouts better.
Demo Old Tile and Cabinets for a Modern Kitchen
Why keep building around dated finishes when a careful demo can reset your kitchen layout for less than a full gut? Start by shutting off power and water, then pull appliances and protect floors with rosin paper and hardboard. Score caulk lines, remove doors and drawers, and back out cabinet screws so you don’t tear studs or drywall.
If you’re saving boxes, label each run and keep hardware in bags. For Vintage tiles, test for lead glaze and asbestos mastic; use a HEPA vac, mist surfaces, and pry from an edge to limit dust and substrate damage.
Patch walls, check for moisture, and square the corners before measuring. With clean framing and flat surfaces, you’ll install Custom cabinetry faster, tighter, and with fewer shims.
Replace an Outdated Deck With Safer Access
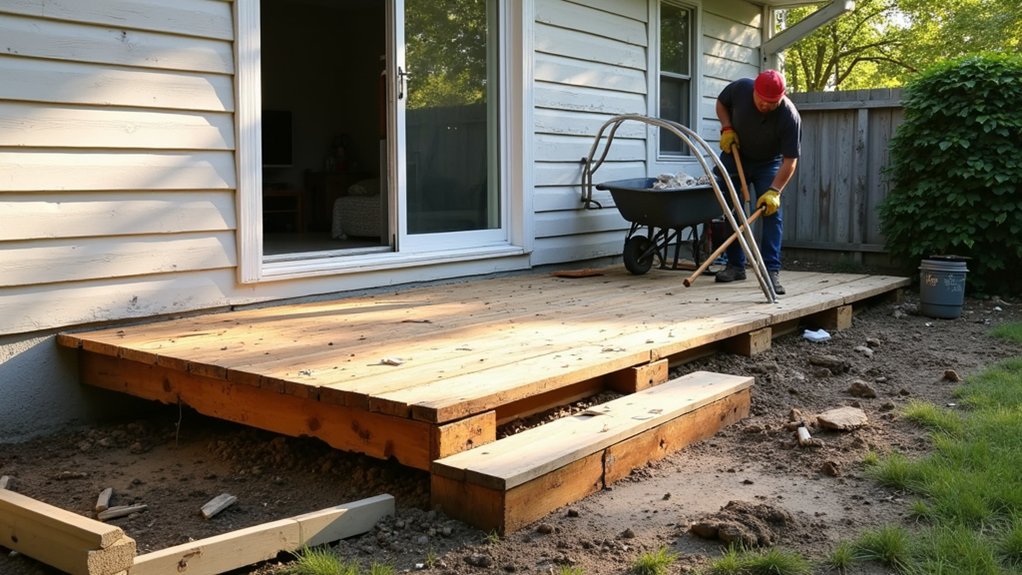
A tired, bouncy deck can turn a simple back-door step into a safety issue, and replacing it with a smaller landing and code-compliant stairs often costs less than trying to patch rot year after year.
Start by removing railings, boards, and joists down to the ledger, then inspect the house connection for rot or flashing gaps. If the ledger’s compromised, you’re better off rebuilding the attachment than reusing it.
Choose pressure-treated lumber or composite decking materials for the new landing, and use galvanized hangers and fasteners to avoid future corrosion.
Keep the footprint tight to reduce material costs, and add a graspable handrail plus anti-slip treads for outdoor safety.
Finish with proper post bases set on concrete so nothing wobbles later.
Know Permits, Asbestos Risks, and Haul-Away Options
Before you swing a sledgehammer, check whether your city requires a permit for demolition, dumpster placement, or any structural removal so you don’t get hit with stop-work orders or reinspection fees. Call building and zoning first, then confirm Permitting requirements in writing, including working hours, noise limits, and sidewalk clearance.
If your home was built before 1980, assume asbestos could be in tile, mastic, pipe wrap, popcorn ceilings, or siding. Don’t grind, saw, or bag it yourself; pay for testing and certified Asbestos management to avoid fines and contamination cleanup.
Plan haul-away early. Price dumpster size by debris volume and weight limits, and ask about overage fees. For concrete or metal, separate loads for cheaper recycling rates. Schedule pickup to prevent extra rental days.
Frequently Asked Questions
What Demolition Work Increases Home Resale Value the Most?
You’ll boost resale most by wall knocking to create an open, modern layout and improve light flow. If costs pencil out, basement removal fixes moisture and adds usable square footage, but permits, utilities, and structural supports can spike.
How Do I Minimize Noise and Dust for Neighbors During Demolition?
Before the first swing, you’ll quiet things down: set up soundproof barriers, schedule daytime work, and warn neighbors. Use dust control methods—plastic sheeting, negative-air fans, misting, and HEPA vacs—to keep cleanup cheap.
Will My Homeowner’s Insurance Cover Accidental Demolition Damage?
Your homeowner’s policy might cover accidental demolition damage, but only if it’s sudden, unintended, and not contractor-caused. Review exclusions, deductibles, and limits, document demolition accidents fast, and require contractor liability Insurance coverage.
How Long Should I Wait Before Repainting After Demolition Dust Settles?
Wait 24–48 hours after your last cleanup; if you still see dust, wait longer. Funny how it resurfaces overnight. Prioritize Painting preparation: thorough Dust removal, HEPA vacuum, damp-wipe, then prime to avoid costly rework.
Can I Live in the House Safely During a Multi-Day Demolition Project?
You can, but only if you confirm structural safety daily and keep clear emergency exits. Seal work zones with plastic, run HEPA filtration, and budget for hotel nights if noise, dust, or utilities become unsafe.